DIY Guide To Servicing Your Mountain Bike – Essential Maintenance
It's a good idea to give your mountain bike some attention by completing a check-over and washing it after a long time of riding it through the mud and grime of the season. This way, it will perform better than ever, and you will require less maintenance in the long run.
Checklists and service schedules only offer general guidelines. In addition, each rider has unique maintenance needs for their mountain bike.
However, maintaining your bike's cleanliness, proper lubrication, and a few routine inspections can significantly increase the life and performance of your mountain bike.
How Can You Service and Maintain a Mountain Bike?
There are several things to take care of when cleaning and servicing your mountain bike.
1. Wash the Dirt Off
It may seem obvious, but when was the last time you cleaned your bike? Use quality brushes and premium bike cleaner to reach all the nooks and crannies and give your bike a fresh coat of polish. You'll regain satisfaction in your gear and identify wear and tear problems as you go through additional maintenance steps.
2. Checking All the Parts
Attention should be given to various parts of the bike, including the suspension, brakes, and bearings, to see if they are working correctly.
Drivetrain
The drivetrain usually suffers the most damage from muddy situations because the chain, derailleur, and cassette constantly turn, and any grit or water in the system will quickly wear out the components.
Let's face it, after riding bikes in the muck, people generally park them in the shed and then forget about it. However, it's essential to clean up everything! It's a smart idea to scrub the cassette, chain, and chain ring with an old toothbrush and some degreaser to remove the grease altogether.
Then, check to see if the gears are shifting and operating smoothly. Finally, ensure the derailleur aligns with the chain line and that everything is straight. You should stop by the local bike repair shop if something is bent or noticeably out of alignment.
If the jockey wheel of the derailleur does not line up with the cog on the cassette at the top and bottom-most speeds, this should be fixable using the limit adjuster screws. Put the bike on a stand, so the front and back wheels can spin freely, then shift up and down the block to ensure everything is smooth and flowing.
Brakes
Your brake pads will last less in the presence of water, grit, and mud, which might result in increased wear and tear. Take off the wheels and check the amount of material remaining on each brake pad. Uneven wear indicates improperly positioned brakes. You should also inspect the discs for damage if there is little or no material.
Once the wheels are back on the bike, you should test how the brake lever feels. If it feels spongy, there must always be a clear, firm bite point. You might want to stop by your local bike shop for a brake bleed because changing the hydraulic fluid removes any air bubbles and replaces the old brake fluid.
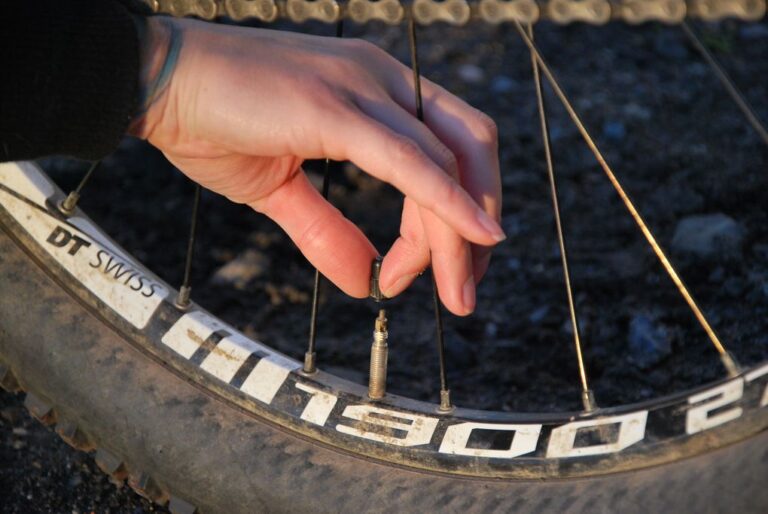
Bearings
A mountain bike has numerous bearings, each of which contributes significantly to the overall operation of the gear. All bearings should function freely and smoothly, but after several rainy rides, they can start to wear down or even stop working.

Image courtesy of bikeradar.com
To examine the bearings in the suspension pivots, you should remove the rear shock and cycle the frame through its pedals. Then, rotate the handlebars side to side to see if they are moving smoothly across their range.
Headset bearings endure a lot of wear and tear and can significantly affect how the ride will feel. Wheel bearings should rotate with minimal to no stiction, and the wheel shouldn't move laterally.
3. Clean the Suspension
It isn't enough to simply clean the external, visible components of your suspension fork and rear shock after a winter that most likely caused damaged seals. Sending suspension units to a qualified servicing facility is an excellent idea for a better quality of rides. After all, you must be prepared for spring and perhaps summer.
4. Change the Rubber
Your bike will have better grip and braking control on the drier trails if you replace and upgrade your old, worn-out, or mud tires to high-quality all-condition rubber.
If you don't need to replace the tires and have been fortunate enough to stay puncture-free all winter, you may still want to top up the sealant because it tends to evaporate, leaving the tire with dried-up latex and no protection.
5. Get New Cables
Is shifting gears comparable to gorilla thumb wrestling? If so, winter has broken through the outer seals, increasing cable friction in your mountain bike. Fortunately, replacing cables and outers is a simple task that will restore the crispness of your shifting to factory standards.
Just remember to utilize the old cable to pull the new wire through if the bike has internal routing; otherwise, you'll get annoyed trying to fish the cable ends out of the depths of your frame.
6. Service the Dropper
When did you remove your seat post last? If not maintained, the steel and aluminum used in seat posts and frames are prone to corrosion, which may cause your post to weld within your seat tube.
Based on whether you have a plastic or metal frame, remove, clean, and reinstall a little bit of copper grease or carbon paste to avoid corrosion. Change the cable when you have the post out of the frame since dropper cables, like gear, can become stuck after the winter.
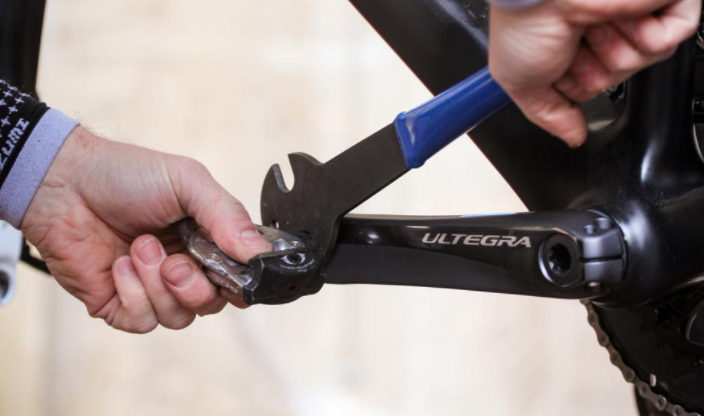
7. Pimp the Pedals
Your pedals endure a challenging life. They are constantly in contact with dirt, knocked against rocks, and ignored. After a winter of inactivity on the ground, you need to care for the pedals.
Some pedals have grease ports that make re-greasing a two-minute process. If we talk about the other pedals, undo the retaining nuts, remove the axle with your hand, and clean every component before re-greasing the pedal body.
Clipless pedal users should inspect their cleats for wear and replace them if they appear battered. In addition, riders may need to replace lost pins to keep flat pedals as grippy as possible.
What Should You Check Before Going for a Ride?
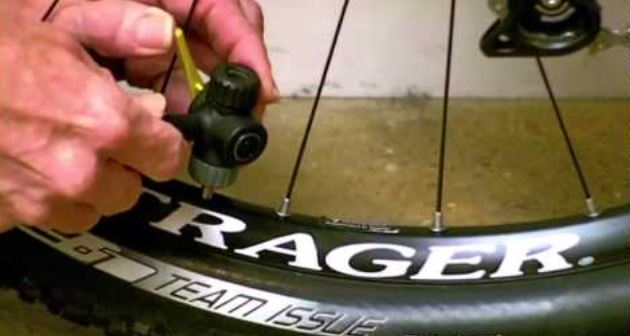
Check the tire pressure to make sure they are positioned exactly how you want. A digital gauge is a quick and affordable alternative to constantly taking out your pump. Changing a flat tire before or during a ride is a bummer.
Always try to check your tire wear and look for any other damage, such as a goat head that can come loose and cause a flat during a ride. Give your brakes a quick test drive around the block to check for air bubbles. While on the test run, check to see if all the gears shift properly.
Make sure nothing has changed since the last time you cycled your bike, mainly if it has been a while, during your test ride. Now is the moment to adjust the height of your saddle or post, and if you have a dropper post, make sure it is functional. When riding downhill, nothing says “terrible day” like having your wheel come off, so check to see if no bolts are loose.
How Often Should You Check Your Bike?
A service will be necessary more frequently for avid cyclists who log hundreds of kilometers weekly than for the typical weekend rider. Therefore, you should have your bike tuned up at least once a year.
Most riders will get a spring tune-up after storing the bike for the winter season. However, you might need servicing twice a year if you ride in the cold and in more challenging conditions like mud and rock.
Checking Your Bike Before Every Ride
Make it a habit to check the below things before every ride. It'll only take a few minutes:
Lube chain
Check tire pressure
Quick release skewers
Test brakes
If you have five to 15 minutes to spare, check the following:
- Check your brakes for stiffness and look at the wear on the pads.
- Tire pressure: fill to the appropriate level.
- Wheel spin: look for rim damage or brake rubbing.
- Drivetrain inspection: change gears and lubricate the chain if necessary.
- Drop check: listen for odd noises or loose parts.
- Check the fork and shock settings and bounce when the suspension sags.
- Inspect the dropper post: make sure it operates smoothly and returns quickly.
- Check the surface of the tires for any rips or cracks.
Regularly After the Ride
After Every Ride
When you return from your ride, examine your wheels and the quality of your axles. Hold a tire and rock it side to side to inspect for play. You should screw your thru-axle tight if it moves slightly. Once the thru-axle is tight, double-check to ensure the hub integrity is still intact.
If you have the time, give a quick spray to your bike to remove the dirt and mud off the bike and its tires.
After Ten to 12 Hours of Mountain Biking
Check your brakes every three to five rides when going downhill. Failing to check your brakes might result in serious accidents when you least expect them. A little rust is okay, but be careful, and get rid of it. Inspect the discs for deformations and rust.
You should check the pressure in your fork and shock because air shocks lose pressure. It's also important to check the chain on your cassette to keep it in good shape. Your cassette, cogs, and front chain ring will wear if it stretches. Chain replacement is far less expensive than cassette replacement.
After Three to Six Months
This maintenance depends on how frequently and vigorously you ride, but after six months, it's time for significant servicing. Bring your bike to your neighborhood bike shop if you don't know how to check the different parts of your bike. It is better to let a qualified mechanic take a look at your bike to avoid mishaps.
During this maintenance, cleaning and lubricating the chain, cassette, derailleurs, and chainrings are required. In addition, you or a professional should check the tread and sidewall of your tires and the knobs and examine them for wear. If you ride tubeless, look for wear and cuts that could let fluid out.
You can also bleed the hydraulic brakes if needed. After this, you should press the brakes if the fluid appears darker than it did previously. Lastly, check the lower forks. It's possible that the oil and seals need to be changed.
Yearly Overhaul
After a year of riding your bike through the mountains and hilly terrain, a significant cleaning overhaul is required. Here, you should disassemble your bike and inspect every component. Again, it is best to leave this part to the professionals because it will be ready as quickly as a day, and your vehicle will be smooth as ever.
Step-by-step Guide to Clean a Mountain Bike Properly
It is vital to keep your mountain bike clean and wash it after every ride, if possible, to steer clear of dirt and dust. Here are a few easy steps to keep your mountain bike clean:
Step 1: Prepare the Bike Wash Area
Finding a decent location to clean your bike is crucial. Look for an area with good drainage. Employ a sturdy bike stand to elevate your bike off the ground and prevent back spray. Make sure you have enough space to work and that the place is well-lit.
Step 2: Use Brushes and Rags to Clean the Bike
It's not particularly expensive to get a brush set, so why not get one for keeping your bike clean? First, scrub off the frame with a big brush and use a medium-sized brush with stiff bristles to clean hard-to-reach places on the bike.
Use little abrasive brushes to clean the drivetrain's components. To remove dirt, insert a small brush into the recesses close to the pulley, teeth, and rings. If you notice any remaining dirt, rinse and repeat the procedure. Remember to thoroughly rinse out the cassette after cleaning it with soap and a brush.
Your chain needs routine maintenance to slow down the wear and tear. Unfortunately, it gathers a lot of dirt and dust, which results in accumulated grime. Use a rag and a degreaser to get rid of the grime. Alternatively, you can use soap and turn the gears before rinsing them with cold water.
Hose off the bike to eliminate any substantial dirt particles from the bike's frame and wheels. Next, clean the headset, seat stays, handlebars, seat post, and brakes with soap and a soft brush.
Use larger brushes to scrape the tires with minimal effort. Soap your brush, start at the valve, and work your way out to the hubs, spokes, and wheels before flipping the wheels to clean the other side.
Step 3: Rinse It Off
You can choose to use soap and water to clean the oily parts. There's nothing wrong with cleaning your bike with regular dish soap because certain brands effectively eliminate grease and grime.
Numerous soaps and washes explicitly made for bikes are available. Using only biodegradable soap or liquid is a smart option in either case. Rinse the muck off your bike using a hose. Do not use a high-pressure hose because it can damage the bike's gear.
All you need to do is rinse the bike off with the hose after everything is nice and soapy. After that, you could decide to reapply soap to specific areas to remove the stubborn dirt patches. It will be simpler to wash the bike if you start at the top and work your way down. This ensures that nothing is left behind to drip downhill to the drivetrain and harm it.
Step 4: Dry the Bike
Long-term exposure to water could cause the metal components of your bike to rust, which is obviously bad for your bike. Some prefer to use a towel to dry their bike, while others may just ride it around the neighborhood for a while. It won't take too long to dry on a bright day. The bike will look nicer if you wipe it down with a cloth and clean up any residue.
Step 5: Lube Where Required
It's crucial to lubricate your drivetrain again since you just scraped all the oil off it. Applying oil to the whole chain length and wiping off any extra to prevent attracting dirt is the standard procedure for lubricating a chain.
Add lubrication to the chain beginning at the master link. Proper lubrication prevents extra wear and guarantees adequate operation in any system made of metal and moving parts.
Avoid adding too much lubricant to avoid wasting it and creating more mess. Additionally, it's crucial to avoid getting any on your disc rotors because doing so will taint them and the brake pads permanently. Finally, check the directions on the bottle of your preferred chain lube because different lubes have different curing timeframes.
Step 6: Finishing Touches
Implementing this step is entirely up to you, but many riders like to add some finishing touches. You might want to give your bike a final buff and shine using bike polish after cleaning. The wax it contains helps repel water and prevents mud from clinging to your frame during long rides, leaving your bike looking glossy and fresh.
It is simple to perform any maintenance tasks, such as fixing the brakes that keep grinding, with a clean bike. Additionally, it's a good idea to regularly check your bike's bolts to ensure nothing has come loose. If everything appears to be in order, you can now take pleasure in a clean, peaceful journey.
What Is the Average Cost of Servicing a Mountain Bike?
The average cost of a bike service varies by region and ranges from $60 to $100. Major tune-ups usually cost between $119 and $150, while minor/basic tune-ups typically cost between $55 and $89 each. In addition, the services offered as part of the tune-up usually affect the price.
If you tune up your mountain bike at a bike repair shop, the services will include:
Check tire pressure
Drivetrain service
Adjust gears, brakes, and cabling
Clean and degrease chain
Adjust the headset and bottom bracket
Minor wheel truing
Lubrication of moving parts
Check all screws and bolts
Safety check
Conclusion
Bikes require routine maintenance to operate at their peak performance, just like cars or other large machinery. Services ensure that your bike performs at its best, help you identify any potential safety problems or repairs, and prolong the life of your bike as a whole.
Preventive maintenance with regular cleaning will make your mountain biking experience enjoyable. Use the cleaning tips and service schedules given in the article to keep your bike in the best shape.